Ghost (blog) on AWS Lightsail with Nginx, Let's Encrypt & Mailgun
Low cost hosting option for a Ghost blog!
 Photo by Nick Morrison on Unsplash
Ghost is a free and open source blogging platform written in JavaScript and distributed under the MIT License, designed to simplify the process of online publishing for individual bloggers as well as online publications.
The Ghost blogging software is free to download and use.
The prerequisites recommended by Ghost are as below
- Ubuntu 16.04 or Ubuntu 18.04
- NGINX (minimum of 1.9.5 for SSL)
- A supported version of Node.js
- MySQL 5.5, 5.6, or 5.7 (not >= 8.0)
- Systemd
- A server with at least 1GB memory
- A registered domain name
However, with the above server requirement of at least 1 GB memory, the minimum cost of the AWS Lightsail instance (linux based) will be $5.00 per month.
It is possible to use the $3.50 per month instance which comes with 512MB memory by using the Alpine docker images available at Docker Hub.
This guide will take you through the steps required for hosting a Ghost blog (docker image) on AWS Lightsail with Nginx webserver, Letsencrypt SSL encryption.
Instructions
Create a Lightsail Instance You can read about AWS Lightsail from my previous post here
Login/create an account with AWS Lightsail and then create an instance: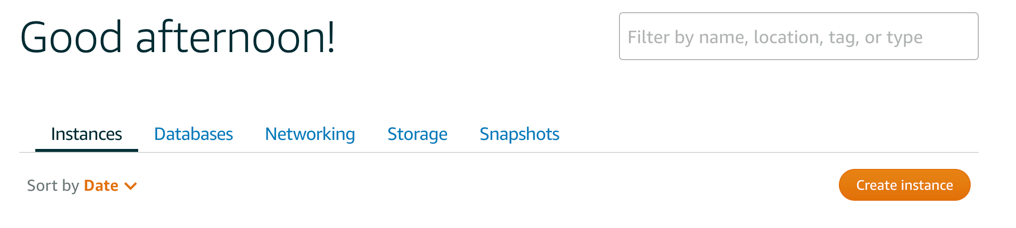
Note: Valid payment details have to be setup with AWS if you are creating the amazon account for the first time.
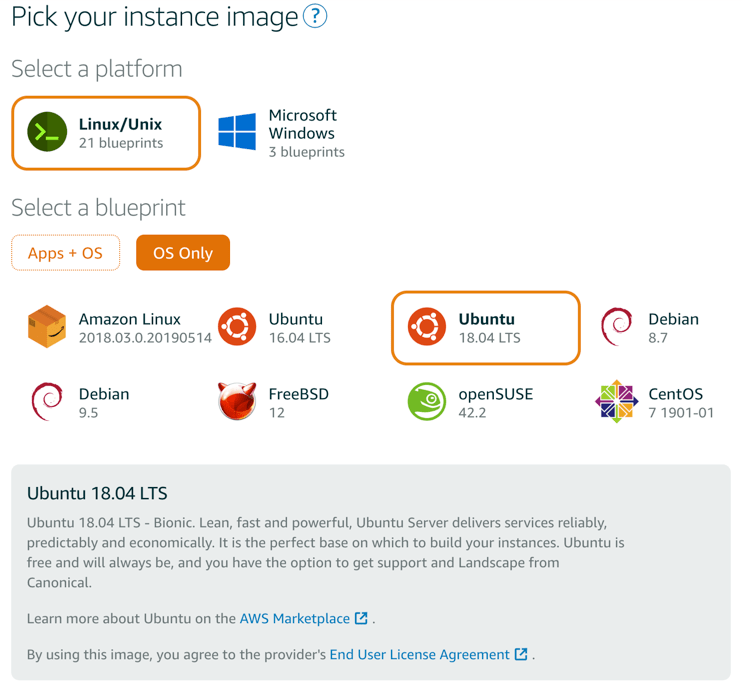
Choose a location as close as possible to the location where you get the most visitors from. For the instance, choose Linux/Unix and select blueprint for OS Only. Under this category, choose Ubuntu 18.04 LTS.
Choose the instance plan for the lowest priced option at $3.50 USD per month.
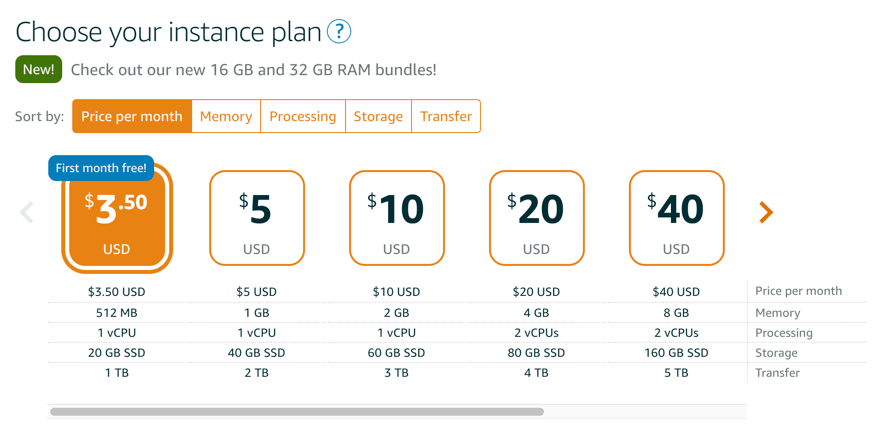
No additional scripts are required at this time. Once you have selected the name for your instance, click on “Create Instance” button.
There are few additional steps required for accessing the instance and the documentation by AWS Lightsail covers the steps in detail. Please follow the link below to setup SSH, Assign a static IP, etc.
https://lightsail.aws.amazon.com/ls/docs/en_us/all
Update Packages
Update the installed packages with the following lines.
# Update package lists
sudo apt-get update
# Update installed packages
sudo apt-get upgrade
UFW
Ubuntu comes with it’s own firewall - UFW , but we will not be enabling this in our case as AWS Lightsail already comes with a firewall which you can configure under the networking tab in your instance. If the HTTPS port is not already available, use the “Add another” option to add the port 443 for HTTPS.
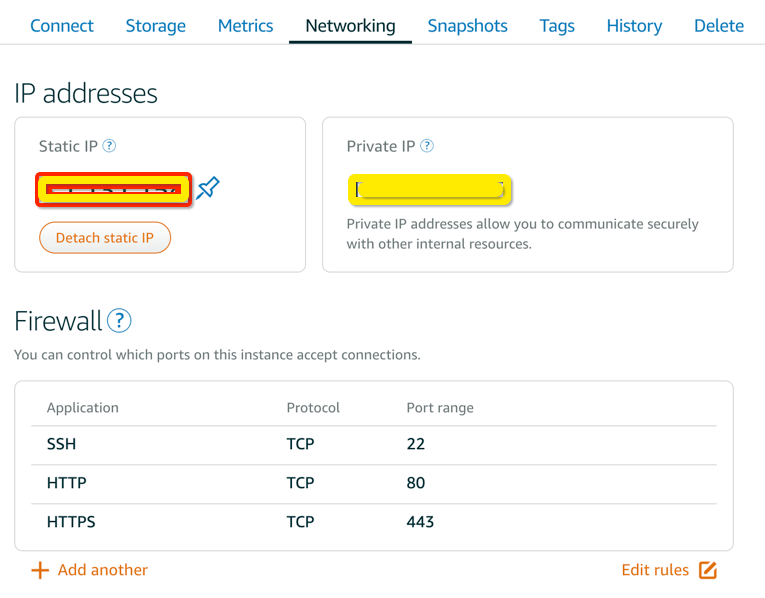
Once you have assigned the Static IP to your instance, modify the DNS Records at the domain registrar to point to the static IP.
- An A record with www.mydomain.com pointing to your server’s public IP address.
- An A record with mydomain.com pointing to your server’s public IP address.
Install Docker
This example uses the script at get.docker.com to install the latest release of Docker CE on Linux.
curl -fsSL https://get.docker.com -o get-docker.sh
If you would like to use Docker as a non-root user, you should now consider adding your user to the “docker” group with something like: (replace your-user with ubuntu)
sudo usermod -aG docker your-user
Install NGINX
nginx [engine x] is an HTTP and reverse proxy server, a mail proxy server, and a generic TCP/UDP proxy server, originally written by Igor Sysoev. For a long time, it has been running on many heavily loaded Russian sites including Yandex, Mail.Ru, VK, and Rambler. According to Netcraft, nginx served or proxied 26.22% busiest sites in April 2019.
Installing NGINX requires only the below command.
# Install NGINX
sudo apt-get install nginx
Once the installation is completed, you should be able to see the default NGINX html page when you access the static ip assigned to the Lightsail Instance through a browser.
Setup NGINX Server block
This step is required so that it’s easier if you want to add/host multiple domains in the same instance. Initially, we will setup the domain name to point to a temporary server block so that the next step for Let’s encrypt can generate the required certificates for the domain.
“VirtualHost” is an Apache term. NGINX does not have Virtual hosts, it has “Server Blocks” that use the server_name and listen directives to bind to tcp sockets. You can find some examples for server blocks at the NGINX wiki page.
We will use the default directory /var/www/html for our initial setup. When you access the url http://mydomain.com, the Welcome to NGINX page should be displayed.
Create a copy of the default configuration into a new file.
sudo cp /etc/nginx/sites-available/default /etc/nginx/sites-available/mydomain.com
Now, open the new file you created in your text editor with sudo privileges:
sudo nano /etc/nginx/sites-available/mydomain.com
Copy the below lines in the editor and save:
        listen 80;
        listen [::]:80;

        root /var/www/html;
        index index.html index.htm index.nginx-debian.html;

        server_name mydomain.com www.mydomain.com;

        location / {
                try_files $uri $uri/ =404;
        }
}
Enable the server block: Now that we have our server block files, we need to enable them. We can do this by creating symbolic links from these files to the sites-enabled directory, which Nginx reads from during startup.
sudo ln -s /etc/nginx/sites-available/mydomain.com /etc/nginx/sites-enabled/
Follow the steps below to prevent hash bucket memory problem:
sudo nano /etc/nginx/nginx.conf
Within the file, find the server_names_hash_bucket_size directive. Remove the # symbol to uncomment the line:
http {

    server_names_hash_bucket_size 64;

}
Next, test to make sure that there are no syntax errors in any of your Nginx files:
sudo nginx -t
If no problems were found, restart Nginx to enable your changes:
sudo systemctl restart nginx
Install SSL certificates with Let’s encrypt
Digital Ocean has an excellent guide for the installation of Let’s Encrypt certificates at this link. However, I will still provide the steps relevant to our current setup based on this guide below.
Install Let’s Encrypt certbot:
sudo add-apt-repository ppa:certbot/certbot
You’ll need to press ENTER to accept.
sudo apt-get install certbot
Obtain the SSL Certificate: Certbot provides a variety of ways to obtain SSL certificates through plugins. The Nginx plugin will take care of reconfiguring Nginx and reloading the config whenever necessary. To use this plugin, type the following:
sudo certbot --nginx -d mydomain.com -d www.mydomain.com
Verify Auto Renewal
sudo certbot renew --dry-run
NGINX Configuration to use SSL
Now, open file you created in your text editor with sudo privileges:
sudo nano /etc/nginx/sites-available/mydomain.com
Copy paste the below lines in the file.
server {
        listen 80;
        listen [::]:80;

        root /var/www/html;
        index index.html index.htm index.nginx-debian.html;

        server_name mydomain.com www.mydomain.com;

        location / {
                try_files $uri $uri/ =404;
        }

}

server {
        listen 443 ssl;
        listen [::]:443 ssl;

        server_name mydomain.com www.mydomain.com;

        location / {
          proxy_pass	http://127.0.0.1:2368;
	        proxy_set_header    X-Real-IP $remote_addr;
	        proxy_set_header    Host      $http_host;
		      proxy_set_header X-Forwarded-Proto https;
	        proxy_set_header X-Forwarded-For $proxy_add_x_forwarded_for;
        }

        ssl_certificate /etc/letsencrypt/live/mydomain.com/fullchain.pem; # managed by Certbot
        ssl_certificate_key /etc/letsencrypt/live/mydomain.com/privkey.pem; # managed by Certbot
        include /etc/letsencrypt/options-ssl-nginx.conf; # managed by Certbot
        ssl_dhparam /etc/letsencrypt/ssl-dhparams.pem; # managed by Certbot

}
Running Ghost on Docker
We will now use a docker file to pull the docker container and install in our Lightsail instance. You may use any path you are comfortable with. I have used the home directory of the default ubuntu user in the example below.
The below script assumes that you also want to configure Mailgun with your Ghost blog for triggering emails from the blog.
The most important piece of configuration once you’ve been through the install process is to setup mail. Mail configuration allows Ghost to send emails such as lost password and user invite emails.
sudo nano /home/ubuntu/ghost.sh
Copy paste the below code in the file. You will have to check the current version of Ghost on Docker Hub and updated the version number to the latest version. As we are on the lowest configuration of Lightsail instance, it is recommended to use the alpine version of the docker image.
#!/bin/sh
docker rm -f ghost

docker run --name ghost \
 -p 127.0.0.1:2368:2368 \
 -e url=https://www.mydomain.com \
 -v /etc/nginx/mydomain/html:/var/lib/ghost/content \
 -e mail__transport="SMTP" \
 -e mail__from="Admin <admin@mydomain.com>" \
 -e mail__options__service="Mailgun" \
 -e mail__options__port="587" \
 -e mail__options__host="smtp.eu.mailgun.org" \
 -e mail__options__auth__user="postmaster@mail.mydomain.com" \
 -e mail__options__auth__pass="<use key from mailgun>" \
 --restart=always \
  -d ghost:2.22.0-alpine
Ghost Docker Hub Link
Once the script has completed running, you should be able to access the Ghost blog using the URL https://mydomain.com
Add /admin to the URL for the initial setup to setup the Ghost admin account.
As we have configured the email with Mailgun in our script file, you can click on send button in the Test email configuration under “Labs” to verify your mailgun settings are working.